
So, you have backups from your Ghost site hosted on Magic Pages – and you want to use these to develop your theme locally? We put together this step-by-step walkthrough, so you can easily restore your backups into a local Ghost instance – no matter whether you're running it via the Ghost CLI or the Docker setup
What's in a Magic Pages backup?
When you request a full backup from the Magic Pages Customer Portal, you get two archives:
MySQL backup (SITENAME-mysql-backup-TIMESTAMP.sql.gz) — your entire database: posts, settings, users, tags, members, everything.
Content backup (ghost-content-backup-TIMESTAMP.tar) — your content/ folder: images, themes, files, media, settings, and public assets.
Together, these give you a complete 1:1 copy of your production site.
Prerequisites
To get started, you need a full Ghost setup with MySQL (not SQLite) running on your machine.
For Docker follow the official Ghost Docker install guide:
For Ghost CLI: follow the official Ghost CLI install guide:
Make sure your local Ghost instance is running and accessible before importing any backups.
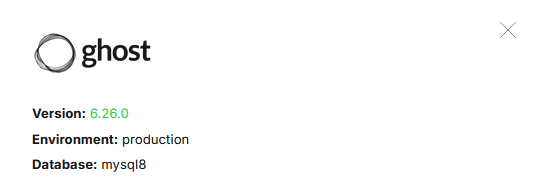
Match your Ghost version
You need to make sure that your Ghost version matches the version that's running on Magic Pages. Otherwise, database structures can divert. Check which Ghost version your Magic Pages site runs in your Ghost Admin → Settings → About Ghost.
For Docker, pin the same version in your docker-compose.yml:
image: ghost:6.26.0-alpine
For Ghost CLI, install the matching version:
ghost install 6.26.0
Don't use ghost:latest or the default install. Version mismatches can cause migration errors or break the import entirely.
1. Download and extract the backups
Go to your Magic Pages Customer Portal → Support → request a "Full Backup". You'll receive an email with download links for both archives (valid for 48 hours). You can also download automatic backups (generated daily for you) anytime directly from the Customer Portal.
Once downloaded, extract both archives:
mp-backup folder in Downloads containing the SQL file and all content folders.mkdir %USERPROFILE%\Downloads\mp-backup
tar -xf %USERPROFILE%\Downloads\SITENAME-mysql-backup-TIMESTAMP.sql.gz -C %USERPROFILE%\Downloads\mp-backup
tar -xf %USERPROFILE%\Downloads\ghost-content-backup-TIMESTAMP.tar -C %USERPROFILE%\Downloads\mp-backupmkdir ~/Downloads/mp-backup
gunzip ~/Downloads/SITENAME-mysql-backup-TIMESTAMP.sql.gz
tar -xf ~/Downloads/ghost-content-backup-TIMESTAMP.tar -C ~/Downloads/mp-backup
mv ~/Downloads/SITENAME-mysql-backup-TIMESTAMP.sql ~/Downloads/mp-backup/2. Copy the SQL dump into the MySQL container
In the commands below, yourproject-db-1 is a placeholder for your MySQL container name. To find yours, run docker compose ps from the folder where your docker-compose.yml lives. The MySQL container will be something like myghost-db-1 – it's based on your project folder name and combined with the service name from the compose file.
docker cp "%USERPROFILE%\Downloads\mp-backup\SITENAME-mysql-backup-TIMESTAMP.sql" yourproject-db-1:/tmp/backup.sqldocker cp ~/Downloads/mp-backup/SITENAME-mysql-backup-TIMESTAMP.sql yourproject-db-1:/tmp/backup.sql# No need to copy — you can import the file directly
# Just note the path to your extracted SQL file3. Drop and recreate the Ghost database
.env file (look for DATABASE_ROOT_PASSWORD or MYSQL_ROOT_PASSWORD) or in config.production.json under database.connection.password for Ghost CLI installs.This next step is destructive. Running this will permanently wipe your local Ghost database. Before proceeding, let's take a quick backup in case you need to roll back.
For Docker:
docker exec yourproject-db-1 mysqldump -u root -pYOUR_ROOT_PASSWORD ghost > ghost-backup-before-import.sqlFor Ghost CLI:
mysqldump -u root -pYOUR_ROOT_PASSWORD ghost > ghost-backup-before-import.sqlOnce you have that, proceed with the next command.
docker exec -i yourproject-db-1 mysql -u root -pYOUR_ROOT_PASSWORD -e "DROP DATABASE ghost; CREATE DATABASE ghost;"mysql -u root -pYOUR_ROOT_PASSWORD -e "DROP DATABASE ghost; CREATE DATABASE ghost;"4. Import the backup
Run following command to import the downloaded backup and restore all tables, posts, settings, users, and members into your local Ghost database:
docker exec -i yourproject-db-1 mysql -u root -pYOUR_ROOT_PASSWORD ghost < mysql-backup-TIMESTAMP.sqlmysql -u root -pYOUR_ROOT_PASSWORD ghost < /path/to/mysql-backup-TIMESTAMP.sql5. Clear Stripe keys (optional)
If the production site has Stripe or memberships connected, Ghost will refuse to run over http and will tell you in the logs, that you'll need a https connection. You'll either see a bad request error or Ghost will crash with Cannot run Ghost without SSL when Stripe is connected.
Clear the Stripe credentials from the database:
docker exec -i yourproject-db-1 mysql -u root -pYOUR_ROOT_PASSWORD ghost -e "UPDATE settings SET value = '' WHERE `key` IN ('stripe_connect_publishable_key', 'stripe_connect_secret_key', 'stripe_connect_account_id', 'stripe_connect_display_name', 'stripe_connect_livemode');"mysql -u root -pYOUR_ROOT_PASSWORD ghost -e 'UPDATE settings SET value = "" WHERE `key` IN ("stripe_connect_publishable_key", "stripe_connect_secret_key", "stripe_connect_account_id", "stripe_connect_display_name", "stripe_connect_livemode");'6. Restore the content folder
For Docker, check your docker-compose.yml for the Ghost content volume mount – find the local path mapped to /var/lib/ghost/content. That's your destination.
For Docker with a named volume, use docker cp to copy through the running container.
For Ghost CLI, the content folder is typically at /var/www/ghost/content/ by default, but check your Ghost config if you've customised the path.
Copy the backup content into whichever path applies to your setup.
robocopy "%USERPROFILE%\Downloads\mp-backup" "C:\path\to\your-project\data\ghost" /s /ecp -r ~/Downloads/mp-backup/* /path/to/your-project/data/ghost/cp -r ~/Downloads/mp-backup/* /var/www/ghost/content/docker cp ~/Downloads/mp-backup/. yourproject-ghost-1:/var/lib/ghost/content/yourproject-ghost-1 with your actual Ghost container name — run docker ps to check. On Windows, replace ~/Downloads/mp-backup with the full path, e.g. C:\Users\YourName\Downloads\mp-backup.7. Disable staff 2FA for local use
Ghost 5.118+ requires email verification for admin login. Since you likely don't have a mail server running locally, you'll be locked out of your Ghost Admin. Disable device verification before starting Ghost:
# Add this to your Ghost service's environment
# section in docker-compose.yml:

security__staffDeviceVerification: "false"
# Add this to config.development.json
# (or config.production.json):
{
"security": {
"staffDeviceVerification": false
}
}ghost install local, Ghost CLI v1.28.2+ automatically disables 2FA for local installs − you can skip this step.8. Start Ghost and log into Ghost Admin
docker compose restart --force-recreateghost restartOpen your local Ghost URL – you should see the full production site with all content, images, and themes.
/ghost/ appended − for example http://localhost:8080/ghost/ for Docker or http://localhost:2368/ghost/ for Ghost CLI. Check the url value in your docker-compose.yml or config.development.json if you're unsure.Gotchas and troubleshooting
Missing theme → 500 error
Ghost shows a 500 error if the active theme from production isn't in the local themes folder. Make sure the content backup includes it, or go to Ghost Admin → Design → Change theme to switch to a different one.
"Cannot run Ghost without SSL when Stripe is connected"
You missed Step 5. Clear the Stripe keys from the database and restart.
"Failed to send email" on admin login
You missed Step 7. Add the staffDeviceVerification: false setting and restart.
Migration lock error
If Ghost crashes with Migration lock was never released, the database import was interrupted or ran into an issue. Go back to Step 3, drop and recreate the database, then re-import.
Images not loading
Check that the content folder was copied correctly (Step 6).
Run commands one at a time
Don't chain multiple docker exec commands on one line. If one fails silently, the next will run against a broken state.